
Welcome to our ultimate guide to nail art tutorials! If you’re looking to unleash your creativity and create stunning nail designs from the comfort of your own home, you’ve come to the right place. In this section, we’ll introduce you to a series of step-by-step tutorials that will unlock your inner artist and inspire you to experiment with different techniques and ideas.
From easy beginner designs to more intricate patterns, our tutorials cater to all skill levels. Whether you’re new to the world of nail art or a seasoned pro, we’ve got you covered. With DIY nail art becoming increasingly popular, we’re here to help you elevate your at-home manicures and take your nail game to the next level.
Our nail art tutorials focus on various design themes, including floral, geometric, ombre, animal print, metallic and foil, abstract, and more. With each tutorial, you’ll learn new techniques and tips to help you achieve professional-looking nail art from home.
So, let’s get started on your nail art journey! Whether you’re looking to create a simple yet chic design or a bold and daring statement, our tutorials will provide you with endless inspiration and opportunities for creativity. Nail art tutorials for creative designs at home are just a few clicks away.
Stay tuned for our following sections where we will dive into specific design inspirations, and techniques to make your own nail art.
Getting Started with Nail Art
So, you want to try your hand at nail art? Great decision! Nail art is a wonderful way to express your creativity and add a unique touch to your style. Whether you’re looking to create simple designs or intricate patterns, there are nail art techniques that are suitable for every skill level. In this section, we’ll introduce you to some easy nail art designs and techniques that are perfect for beginners.
Basic nail art techniques
Before you jump into creating nail art designs, it’s important to familiarize yourself with the basic techniques of nail art. These include:
- Base coat and topcoat application
- Polish application
- Dotting tool use
- Striping tape application
- Sponge gradient
- Stamping
You can find many tutorials online to help you learn these techniques, but we’ll also cover some of them in this article to get you started.
Easy nail art ideas for beginners
Here are some easy nail art ideas that are perfect for beginners:
- Polka dots: Use a dotting tool or toothpick to create small dots on your nails. Choose two complementary colors for a simple, yet cute design.
- Stripes: Use striping tape to create clean and straight lines on your nails. You can use two or more colors for a fun and bold design.
- Glitter accent nail: Apply a glitter polish to one nail on each hand for a simple, yet eye-catching design.
- Gradient nails: Use a makeup sponge to blend two or more colors together on your nails for a gradient effect.
With these easy nail art designs and techniques, you’ll be well on your way to creating stunning and unique nail art designs. Don’t be afraid to experiment and try new things – that’s the beauty of nail art!
Floral Nail Art Designs
If you’re looking for easy nail art ideas that are also beautiful, why not try some floral designs? Flowers are a timeless inspiration for nail art, and there are so many different ways to incorporate them into your manicure.
Start with a light-colored base coat, and then choose your favorite shades for the petals and leaves. For a simple but striking design, try painting a single flower on each nail using a small brush or toothpick.
If you’re feeling more ambitious, create a bouquet by painting several smaller flowers on each nail. Mix and match different colors and styles to create a unique and eye-catching design.
For an even easier option, use a pre-made floral nail decal or sticker. Simply apply it to your nails after your base coat has dried, and then finish with a layer of top coat to seal it in.
A Quick Tip for Easy Floral Accent Nails
Want to add some floral flair to your manicure without going all out? Try painting just one accent nail on each hand with a single flower. This is an easy and subtle way to incorporate some floral nail art into your look.
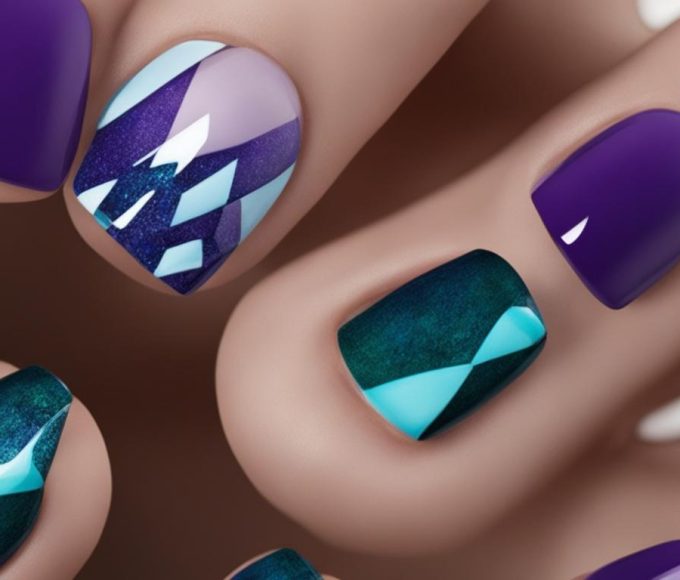
Geometric Nail Art Designs
If you’re looking for modern and minimalist nail art ideas, geometric designs are perfect for you. These patterns add a touch of sophistication to your nails and are easy to create with a steady hand and some patience. Here are some ideas to get you started:
Triangles
Triangles are one of the simplest geometric shapes, yet they can create striking nail art designs. You can create a classic French manicure with a triangle tip, or mix and match different colors and sizes to create a unique look. To make a triangle, simply paint a diagonal line from one side of your nail to the other, and then add two more lines to form a triangle.
Chevrons
Chevrons are a popular choice for nail art, and for good reason. These V-shaped patterns can be bold or subtle, depending on the colors and placement. You can create chevrons by painting a V-shape at the base of your nail and then filling it in with color. Alternatively, you can use striping tape to create precise lines.
Abstract Shapes
If you want to get really creative with your nail art, try experimenting with abstract shapes. These designs can be anything you want them to be, from squiggles to circles to asymmetrical lines. You can use a small nail art brush or toothpick to create these shapes, or even stamp them on using a nail stamping kit.
With these geometric nail art ideas, you can achieve a sleek and modern look that’s perfect for any occasion. Don’t be afraid to experiment with different colors and shapes to create a unique design that’s all your own.
Ombre and Gradient Nail Art
Create a mesmerizing effect on your nails with ombre and gradient nail art. This technique allows for a smooth transition of colors, giving your nails a stunning look.
Tools You’ll Need
- Nail polish colors of your choice
- A makeup sponge
- A small dish or palette
- A piece of paper or tape to protect your skin
- A top coat
Choose two or more nail polish colors that complement each other. You can create a gradient with any color combination, from soft pastels to bold neons.

Start by painting your nails with a base coat and let it dry completely. Apply a light color of nail polish over the entire nail as the base color. Then, pour a small amount of each color onto a palette or piece of paper. Cut a small piece of the makeup sponge and dip it into the first color.
Using the sponge, apply the color to the bottom half of your nail. Don’t worry about getting the polish on your skin as you will clean it up later. Repeat with your other colors, applying them in a gradient pattern.
Once you’ve applied all the colors, use the sponge to lightly blend them together. This will create a seamless gradient effect. If needed, you can apply more polish to intensify the colors, but be careful not to overdo it.
After you’ve achieved the desired gradient effect, let your nails dry completely. Once dry, use a small brush or Q-tip to clean up any polish that got on your skin. Then, apply a top coat to seal in the colors and give your nails a glossy finish.
Experiment with different color combinations and techniques to create unique ombre and gradient designs. You can also try using a small brush for a more precision gradient or adding glitter for a sparkly finish.
Incorporate ombre and gradient nail art into your nail routine for a stunning and on-trend look. Try it now!
Animal Print Nail Art
If you’re looking for an easy nail art idea that will add a touch of fierceness to your nails, animal print designs are the way to go. From leopard spots to zebra stripes, these fun and fashionable designs are perfect for any occasion.
Getting Started
Before you begin, make sure you have all the necessary tools and supplies on hand. You’ll need a base coat, a top coat, a nail polish in the color of your choice, and a black polish or nail art pen for creating the animal print pattern. You may also want to use a dotting tool or toothpick to create smaller details.
Design Ideas
When it comes to animal print nail art, the possibilities are endless. Here are some ideas to get you started:
Leopard Print:
Apply a nude or light brown base coat, then use a black nail art pen to create small, irregular-shaped circles. Add smaller dots in between the larger ones to create a realistic leopard print pattern.
Tiger Stripes:
Apply an orange or yellow base coat, then use a black nail art pen to create diagonal stripes across your nails. Add small, vertical lines within the stripes to create a realistic tiger print.
Zebra Stripes:
Apply a white or black base coat, then use a black or white nail art pen to create thin, vertical stripes across your nails. Connect some of the stripes to create a zig-zag pattern.
Tips and Tricks
Here are some tips and tricks to ensure your animal print nail art turns out perfectly:
– Start with a thin brush or nail art pen, and gradually build up the thickness of the lines as needed.
– If you make a mistake, don’t worry! Simply use a cotton swab dipped in nail polish remover to clean up any smudges or mistakes.
– Experiment with different colors and patterns to create your own unique animal print designs.
– Seal in your finished design with a top coat to ensure it lasts as long as possible.
With these easy tips and tricks, you’ll be able to create stunning animal print nail art designs that are sure to impress.
Metallic and Foil Nail Art
Are you looking for creative nail art ideas that will make your manicure stand out? Look no further than metallic and foil nail art! This technique allows you to add some sparkle and shine to your nails, creating a glamorous and eye-catching look.
There are many different ways to incorporate metallic and foil elements into your nail art designs. You can use metallic polishes to create a shiny base coat, or add foil accents to create intricate patterns and designs.
One popular technique is to use nail foils, which come in a variety of colors and designs. To create a foil manicure, start by applying a base coat of nail polish and allowing it to dry completely. Then, apply a layer of foil adhesive to your nails and wait for it to become tacky. Finally, press the foil onto your nails, rubbing it gently to ensure that it adheres properly. Once the foil is in place, seal your manicure with a clear top coat.
If you’re feeling creative, experiment with different color combinations and designs to create a unique and personalized look. For example, try combining metallic and matte polishes for a contrasting effect, or use foil accents to create geometric patterns or floral designs.
With metallic and foil nail art, the possibilities are endless. So grab your favorite metallic polishes and get ready to add some shine to your nails!
Abstract Nail Art Designs
Let your imagination run wild with abstract nail art designs. You can create a range of unique patterns and textures using different tools and techniques. Abstract nail art is perfect for those who want to express their creativity without being tied down to specific motifs or themes.
Here are some nail art ideas and techniques to get you started:
Crayon Nail Art
One fun and easy way to create abstract nail art is by using crayons. First, apply a base coat of your desired color. Then, using a crayon, draw random shapes and lines on your nails. Finally, seal your design with a top coat. You can experiment with different color combinations and designs to achieve a unique and playful look.
Striping Tape Nail Art
Striping tape is a versatile tool that can be used to create a range of abstract patterns on your nails. First, apply a coat of your desired base color. Then, use striping tape to create your desired pattern. Paint over the tape with your second color, and carefully peel off the tape while the polish is still wet. Finish with a top coat for a sleek and modern look.
Dotting Tool Nail Art
If you have a dotting tool, you can create a range of beautiful abstract designs. First, apply your base color. Then, using the dotting tool, create random dots and shapes on your nails. You can use different colors and sizes to achieve a unique and eye-catching look. Finish with a top coat for a glossy finish.
With these nail art techniques and ideas, you can create stunning and inventive abstract designs that are sure to impress. So grab your tools and get creative!
Water Marble Nail Art
If you’re looking for a nail art technique that creates unique and mesmerizing designs, water marble nail art is the way to go. This technique involves swirling different colors of nail polish in water to create intricate patterns on your nails. Here’s how to do it:
Step 1: Prep Your Nails
Start by prepping your nails. File them into your desired shape and push back your cuticles. Apply a base coat to protect your nails from staining and help the nail polish stick better.
Step 2: Choose Your Colors
Choose the colors of nail polish you want to use for your water marble design. You can use as many colors as you’d like, but it’s best to stick to colors that complement each other.
Step 3: Fill a Bowl with Water
Fill a bowl with room temperature water and let it sit for a few minutes to settle. It’s important to use room temperature water to avoid the nail polish drying too quickly.
Step 4: Drop the Nail Polish into Water
Drop a few drops of each color of nail polish into the water. Use a toothpick to swirl the colors together to create the desired pattern.
Step 5: Dip Your Nails in the Water
Protect your fingers from the nail polish by applying tape around your nails. Dip your nails into the water at an angle to ensure the entire nail is submerged. Use a toothpick to remove any excess nail polish from the surface of the water.
Step 6: Remove Your Fingers
Slowly remove your fingers from the water. Use a toothpick to remove any excess nail polish from your skin. Wait for your nails to dry before applying a top coat to seal in the design.
Water marble nail art takes some practice to master, but the results are worth it. With this technique, you can create beautiful and unique designs that will make your nails stand out. Try different color combinations and patterns to find the perfect water marble nail art design for you.
Stamping Nail Art
You don’t need to be an artist to create intricate nail art designs that will turn heads. Stamping nail art is a simple and effective technique that allows you to achieve professional-looking designs with minimal effort. Here are some tips and tricks to get you started:
What You’ll Need
To get started with stamping nail art, you’ll need:
- A stamping plate with a design of your choice
- A stamping tool
- Nail polish in your desired color
- A scraper
You can find stamping kits online or at your local beauty supply store. Look for kits that contain multiple plates to give you a variety of design options.
How to Do It
The stamping process itself is relatively simple:
- Apply a base coat to your nails and let it dry.
- Apply your desired nail polish color to the design on the stamping plate.
- Use the scraper to remove any excess polish from the plate.
- Use the stamping tool to pick up the design from the plate.
- Stamp the design onto your nail in a rolling motion.
- Repeat on all nails and let them dry.
- Apply a top coat to seal the design and add shine.
With a little practice, you’ll soon be able to create intricate designs that look like they were done by a professional.
Tips and Tricks
Here are a few tips to help you get the most out of your stamping nail art:
- Always work quickly to avoid the polish drying out before you stamp.
- Use a light touch when picking up the design to avoid smudging.
- Experiment with different nail polish colors and stamping plates to create unique designs.
- Clean your stamping plate and tool after each use for best results.
Stamping nail art is a fun and easy way to create unique and professional-looking designs at home. Whether you’re a beginner or an experienced nail artist, give stamping a try and unleash your creativity.
Festive Nail Art for Special Occasions
Holidays and special occasions are the perfect time to show off your creative nail art skills. Whether it’s Halloween, Christmas, or Valentine’s Day, there are plenty of opportunities to experiment with festive designs.
Halloween
Embrace the spookiness of Halloween with easy nail art designs. Paint your nails with black or orange base coat and add some cute and creepy accents like bats, witches, or spider webs. You can also create a gradient effect with different shades of orange or black to add an extra touch of creativity.
Christmas
Get in the holiday spirit with Christmas-themed nail art. Go for classic red and green or add some glitter for a festive touch. Snowflakes, candy canes, and Christmas trees are popular designs that you can easily create at home.

Valentine’s Day
Show some love with Valentine’s Day nail art. Go for classic pink and red or add some heart-shaped accents. You can also experiment with ombre effects or glitter to make your nails stand out.
With these easy nail art ideas, you can celebrate any occasion with style. Impress your friends and family with your creative nail art skills and make any day a little more special.
Nail Art Tips and Tricks
Now that you have learned various nail art techniques and designs, here are some tips and tricks to take your DIY nail art to the next level.
Prepare Your Nails Properly
Before starting any nail art design, it’s essential to prep your nails properly. Start by removing any old polish and filing your nails to the desired shape. Then, gently push back your cuticles and use a buffer to smooth out the surface of your nails. This will ensure that the polish adheres evenly and your nail art lasts longer.
Use the Right Tools
To achieve professional-looking nail art, it’s important to use the right tools. Invest in a good-quality brush set that includes different brush sizes and shapes. This will help you create precise lines and intricate details. Additionally, use a dotting tool to create dots and other small designs. You can also use toothpicks or bobby pins as a DIY alternative.
Experiment with Different Nail Art Techniques
Don’t be afraid to experiment with different nail art techniques to find what works best for you. Try combining different techniques to create unique and personalized designs. For example, you can use water marble and stamping techniques to create a one-of-a-kind look.
Practice Makes Perfect
Like any other skill, nail art requires practice. Don’t get discouraged if your first attempt doesn’t turn out as expected. Keep practicing, and you will see your skills improve with time. Don’t forget to take breaks to avoid straining your eyes and hands.
Troubleshoot Common Issues
If you’re experiencing issues with your nail art, don’t give up just yet. Here are some common problems and how to solve them:
- If your polish is too thick, add a few drops of nail polish thinner to make it more manageable.
- If your nail art smudges or chips easily, apply a top coat to seal the design and protect it from damage.
- If your nails aren’t drying fast enough, try applying a quick-drying top coat or using a nail dryer.
By following these tips and tricks, you can create beautiful and professional-looking nail art designs right from the comfort of your own home.
Remember to have fun and let your creativity shine through!
Keywords: nail art techniques, DIY nail art


